2002 VTX 1800 C
Most of my images are roll-over images. Simply roll your cursor over the image to see another one.
This is a link to the full text of the install tips AND color pictures with annotations and for a detailed accounting of how I modified the tubing, fittings and even the running of the line.
What is written below is identical to the pdf link (above) only without pictures.
Actually, installing the HID headlight was far easier than this install. The main reason this was more difficult was I wanted to re-rout the pressure line from the way the gauge tells you to do it AND change out the compression fittings and nylon tube to a stainless line. My reason being that I wanted this to be a modification which wouldn't; cause me more problems than not having a gauge at all. Seeing how the oil pressure is run under the bike, I would hate to have a compression fitting come loose on a long ride, have oil spewing out under my bike at 75 PSI and not even know it until it coated my rear tire and it was too late. In other words, a gauge is nice, but if you have to worry about it it's not worth the effort to install it.
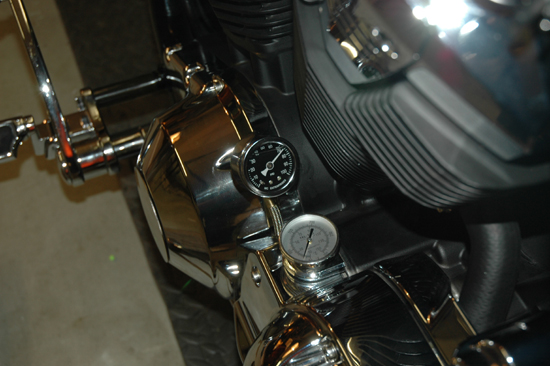
VTX Oil Pressure Gauge Install Tips (TEXT ONLY)
As I mentioned on above, making sure that you will not have any problems after
this install is crucial since the oil pressure line runs under your bike. A
leaky oil line under your bike can have disastrous consequences-mainly because
you won't know it's leaking until your bike either runs out of oil or you crash-or
both. Remember, it's pumping at around 75 PSI which is like having a gash in
your femoral artery; if it springs a leak-you won't last long.
I started with the MC Enterprises Analog oil pressure gauge for the VTX.
Part # 1619 which I initially saw in a J.P. Cycles catalog but has since been
discontinued. I found MC Enterprises on-line and contacted them directly. The
steel braided line shown in the JP Cycles catalog has been replaced by what
is in my estimation an inferior nylon tube. Obviously it does not have the same
look nor the durability of a stainless line. Instead of having two permanent
fitted ends, it relies on compression fittings. Anyone who has had a compression
fitting under their refrigerator blow knows they do not last long.
MC Enterprises 460 South Lombard Street, Oxnard, CA 93030 (805) 988-1010
http://www.mcenterprisesusa.com/
For that reason I opted to not use the nylon tubing which is supplied with the gauge nor use the compression fittings.
This is the stainless line I purchased:
This is a list of the stainless tubing and necessary metric to American adapters and tapered fittings:
Braided Stainless steel pressure hose:
Auto Meter part # 3227 3' length (although it could be shorter)
Auto Meter 1/8 " NPT to 1/8" BSPT adapter part number 2269
http://www.autometer.com/default.aspx
First, I did not want to run the pressure line over the engine as recommended.
Instead I opted to run it under the side cover for a cleaner look. This did
not require any modification but in order to lessen the stress on the braided
stainless line I opted to grind away a portion of the side cover about the size
of the tip of my little finger.
I opted to run it UNDER, not over the engine.
I ran the cable under the bike and fastened it to an already existing clamp on the left side frame which holds a wiring harness.
There are two oil gallery bolts under the bike on each side. Since I had the 3' stainless braided cable it allowed me to use the one on the right side of the bike instead of the one on the left side (near the drain plug). The reason I opted for the right side is the left side is harder to get at the bolt due to the chrome cooling line.
Simply remove the oil gallery bolt on the right hand side and install the hollow
bolt which is supplied with the oil gauge. Then install the metric to American
conversion adapter, then the tapered fitting which is supplied with the stainless
tubing. It will look like this and be quite long. I ran into a slight problem
with the overall length in that it just barely contacts the right hand side
engine mount. Again, to relieve and stress from rubbing over time I ground away
a small corner of the engine mount (while still on the bike) so I wouldn't have
to worry about it possibly rubbing away the braiding over time.
This is a side view from the lower right side of the bike:
As always with my personal VTX modifications, I have posted these for your entertainment only. If you chose to perform any modification to your motorcycle such as I have, you, like I, take full responsibility for your actions.
|
This is Wyatt. Welcome to my VTX 1800 "C" home page. Click on the links above to visit different web pages I have designed to illustrate differences in add-on equipment. I'll be updating this whenever I test a new piece for my bike.
|