Xenon HID performance
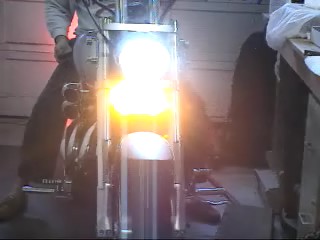
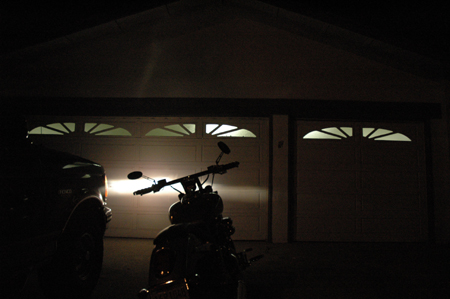
This is by no means meant to be a side-by-side comparison of vehicle lighting. I used my Ford Bronco next to my bike to attempt to illustrate the difference in light color and luminance (not related) between a typical halogen bulb and a true HID Xenon bulb. My Bronco actually has an after-market PIAA bulb with supposedly greater intensity than the stock set-up. Of course, you really have to see the difference to appreciate it, but notice in this roll-over image the difference in color and especially the difference in the dispersing of light to the immediate ground in front of the bike and to the overall garage doors and roof line. Clearly the Xenon washes a greater area with a more realistic daytime light.
This was one of the simplest mods I have done. Even if you have a complete fear of electrical wiring with this plug-n-play set-up it's a snap. I alone was able to completely install this unit in 35 minutes. This is a pdf version of the installation tips for printing:
I opted for this brand from Xenon Depot
http://www.xenondepot.com/product.php?product_id=33
This also appears to be another good brand and you can get a kit for more money which will have a HI beam, although apparently it's rather worthless for anything other than passing an inspection.
http://www.xenonking.com/3000m.htm
Choosing a bulb depends on your application. For example do you do a lot of riding in very dark back roads or mainly on cruising boulevards. A high rating bulb means more "cool" blue appearance but less actual usable light.
This is a portion of a very good article I saw on-line courtesy Xenon Depot. You can click below for the full informative article.
Full Article click here…
http://www.xenondepot.com/htec.php
Color Temperature is a measurement in Degrees Kelvin that indicates the hue of a specific type of light source. Many people believe the misconception that color temperature is a rating of the brightness of the bulb or HID kit. This belief is completely false. The reality of the matter is that the higher the color temperature, the less useable light output you will obtain. A perfect example would be a black light. This light has a color temperature of approx 12,000k and has almost no useable light or lumens output. Higher K kits such as 7000k, 7500k, etc. have been manufactured for individuals that are more concerned about the actual color output of their lights as opposed to the actual useable light output they produce.
Motorcycle HID Conversion Kit
4300k Motorcycle HID Conversion Kit
(MC-4k)
Price: $299.99
Sale Price: $199.99
Qty. Options:
Our 4300k Motorcycle HID Conversion Kit will use Philips bulbs and specially
designed ballasts for motorcycle applications. This product will be plug+play
and will not require you to modify your motorcycle in any way.
This kit will include the following:
1 x Philips 4300k Capsule
1 x Motorcycle Application Ballast
Complete instruction manual
For motorcycles using a single H4, 9004, and 9007 bulb for both low and high beam , you will lose your high beam functionality.
Installing the HID kit:
I'm including this article because 1) there were NO instructions which
came with mine (though the company was good enough to email me the same
a day their instructions). You do not really need instructions, and that's
a good thing since the ones they supplied are worthless.
Essentially the kit includes a small black relay box, igniter, ballast and bulb.
The relay box gets mounted on the front left coil and has a fuse box connected to a red wire which needs to be connected to the positive side of the battery, a green wire which needs to be connected to ground, and the remaining two leads get connected to the ballast and the old headlight socket.
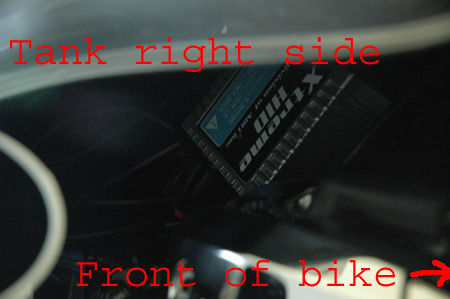
The ballast gets mounted under the right hand side of the tank and gets connected to the relay and the igniter.
The igniter gets mounted inside of the headlight housing, and gets connected to the new Xenon bulb and the ballast.
First remove the seat for access to the battery and get the tank prepped for access under it. This requires removing the tank bolt, and gauges for access. You do not need to remove the tank, just lift it up for access. If you do not know how, visit Bare's web page for detailed instructions. Look under Pair Valve removal or click here: http://www.bareasschoppers.com/
Here's how I stashed all of that stuff.
INSTALL THE BULB

Remove the three Phillips screws and the front headlight cowl to access
the old bulb.
Unplug the wires from the old bulb.
Un-clip the anodized clip which holds the old bulb in place and install
the new Xenon bulb being careful not to touch the glass-if you do-wipe
it off gently with isopropyl alcohol..
Now set this front assembly aside until you are done running the wires in and out of the back of the cowl.
INSTALL THE IGNITER:
The igniter seen below has two connections. One goes to the new bulb and the other end goes to the ballast which you will mount under the tank on the right side. Place the igniter itself in the headlight housing and feed the wires to the ballast out the back-the wires to the bulb stay where they are for now.
Now feed the wires from the igniter from inside the housing out the back-the
igniter stays in the housing. This is the igniter:
The igniter needs to stay in the headlight bucket since the leads are
so short. It fits in there and I stashed it above the headlight housing
itself just before closing it up.
The new bulb has water resistant plugs which carry high voltage. These
are connected to the igniter you stashed in the headlight housing. Run
the end that plugs into the ballast out the back of the cowl and around
the left side of the engine (or whatever) and have it ready to plug it
into the ballast you will mount on the right frame rail under the tank.
INSTALL THE RELAY:
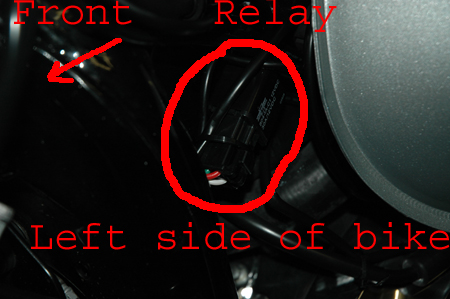
The relay can be mounted along with the green ground wire to the front left hand coil's front bolt. This coil is located just in front of the left hand side tank bushing near the steering stem. You will be able to see the black relay box after it is mounted but it's really not noticeable. With the tank pulled slightly back off of its front bushings, this area is easily accessible. You may want to do the ground fix for this coil while you're in there since it's readily available.
Now mount the relay on the front left coil's bolt.
Remove the front 10mm bolt and add the ground wire, then the relay and
re-attach to the frame. The ground wire MUST be in contact with the coil
or the frame and cannot be insulated by the relay which has a plastic
housing. It gets connected UNDER the relay on the front coil bolt so it's
touching the frame of the bike (ground). I suggest that you put the relay
on the bolt, then the ground wire, then the coil and attach it to the
bike so that the coil is still in contact with the frame, then the green
ground wire then finally the relay.
The red wire from the relay continues back to the positive terminal on the battery and I just fished it along under the tank to the battery making sure it wouldn't get pinched when you re-install the tank. You'll need to remove the seat and plastic battery top with three Phillips screws to access the battery's positive lead of course.
One end of the remaining relay's wires looks like the headlight bulb male prongs and in fact plugs into the old bulb socket in the headlight housing. Run this wire in from the back of the housing and connect the new male plug from the relay to the old bulb socket (you'll see they match up perfectly). These are the three prong plug and socket that plugged into the back of your old bulb.
The remaining wire off of the relay will get connected to the ballast.
Run the lead under the tank over to the right side of the frame where
it will plug into the ballast along with the wire from the igniter.
MOUNT THE BALLAST:
This is the ballast…
If your bike is like mine there's no purge valve under the right hand side of the gas tank and there's two handy sockets where the bolts came out of. Use one of these 10mm bolts to mount the ballast--wires facing down. Note: I borrowed this picture from Bare's web page to illustrate the 10mm bolt option. Of course in order to do this you must at least lift the tank up to gain better access for running all of the wires and mounting the ballast. If you are unsure how to raise your tank, check out Bare's web site and look under Pair Valve removal or click here: http://www.bareasschoppers.com/
Ballast after being mounted and tank re-installed:
This install avoids using the double stick tape and some of the tie downs
which accompany the kit. I feel bolting these components to the bike makes
for a more finished install and may actually take less time.
Once you have completed the above you're ready to test it out. Be sure
and start your bike with the high beam switch ON. This is the OFF position
now for your HID lights. The high beam indicator lamp will light reminding
you that your headlights are not on.
Once the bike has started, simply flick the high beam switch off and the HID comes on-slowly at first and then to full brightness in about 5 seconds. Here's a clip if you want to see how long it takes.
Start up movie.